How To Customise Your Airtime Pro Radio Page
Customising the look and functionality of your online radio station is a great way to get your branding message across and forge a deeper connection with your audience. Fortunately, Airtime Pro’s radio page offers a range of customisation options that are easy to implement and will have an immediate impact. We’ll guide you through the basics below.
If you don’t yet have a station or are unfamiliar with our internet radio software Airtime Pro, we offer a free 7-day trial (no credit card required) that gives you full access to the software. Any changes, customisations or content you add during the free trial will be retained once you sign up and pay for one of our regular plans.
Step 1: Brand Your Station
To begin customising, log on to your station, then go to Settings and select the Radio Page tab from the left-hand menu.

Brand Your Station
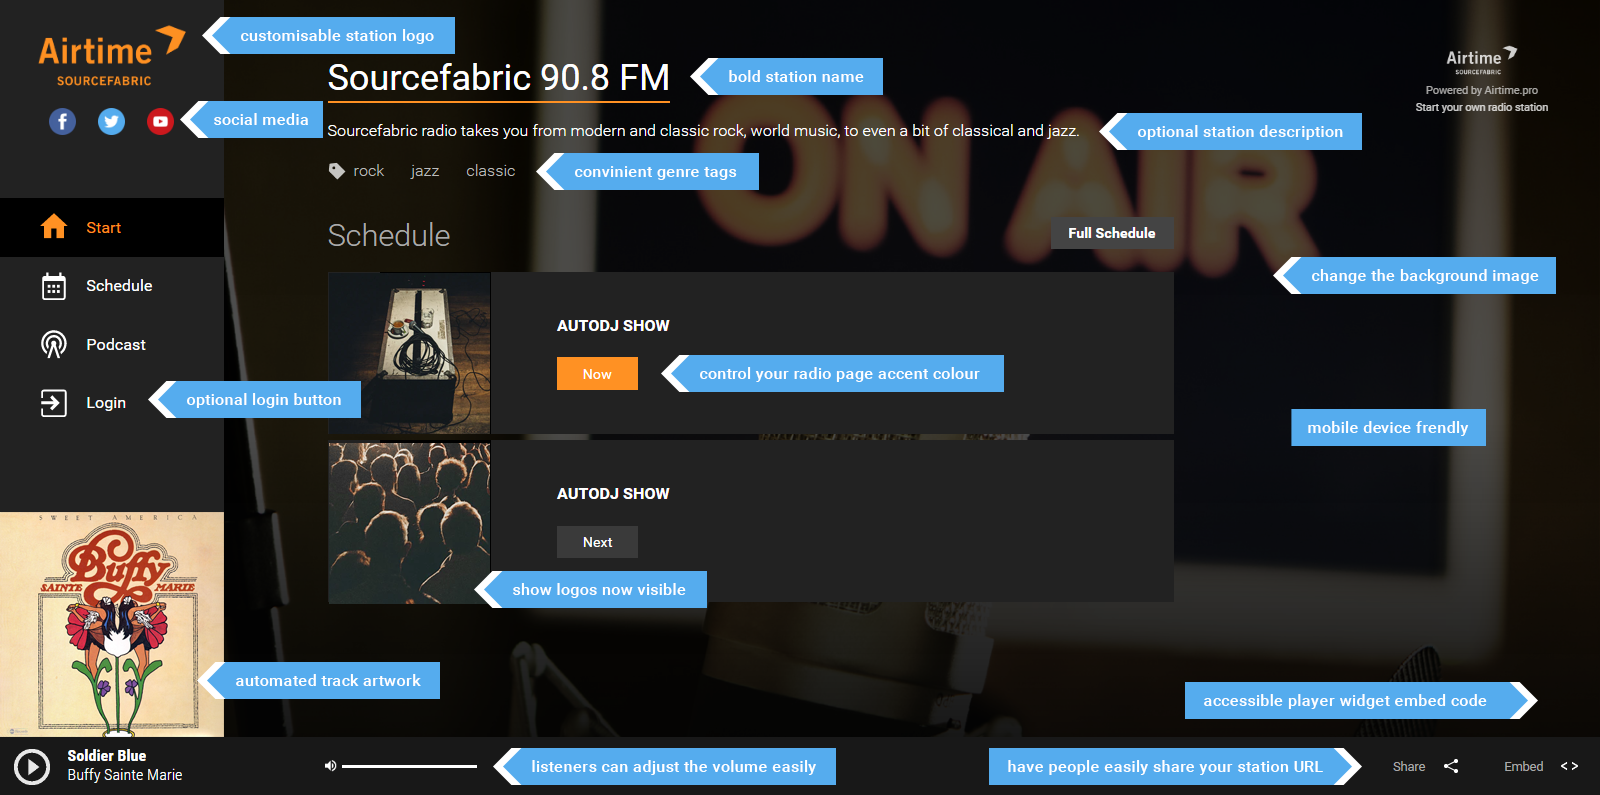
Starting from the top of this page, you’ll find fields for your station’s name and description. Your station name will appear on the top of the page (see image below) and can be different than the station ID you provide when you register. The station name can be changed at any time, but the ID is fixed and becomes part of the URL for your station. Enter a description below the station name to expand upon your station’s identity. By default, the description will read “Powered by Airtime Pro”, so it’s a good idea to change this and describe what type of programming your listeners can expect.
Just below that, you can get even more specific by creating and adding your own genre tags (jazz, pop, techno, talk radio, etc.).
Step 2: Integrate Social Media
Now, visitors will know exactly what your station is all about, and it’s time to start promoting it. Social media is one of the best ways to get the message out and attract listeners. Icons for Facebook, Twitter and YouTube appear in the Navigation Bar on the left side of your Radio Page and are by default set to Airtime Pro’s social media channels. You can remove any of these icons altogether by deselecting them in their individual dialogue boxes. Better yet, enter your own social media handles, and listeners will be able to conveniently stay in your social loop.
Step 3: Create A Visual Identity
A visually striking logo is another great way to build your station’s identity and make a lasting impression on visitors. If you don’t already have one, there are numerous online sites (some are even free, such as LogoMakr) where you can create your own logo in minutes. Once you have one, click the Choose File button under Station Logo to upload it. After doing so, go to your Radio Page and hit refresh, and it will appear in the top left corner of your station’s page instead of the default, which appears as “RADIO”.
You can further personalise your page by selecting your image of choice for the page’s background. Our default image is a picture of a radio studio with a microphone and on-air sign. Replace it by clicking the Choose File button in the Station Background Image section of your Radio Page and uploading any image you prefer.
Each show that you air on your station, including AutoDJ shows, is distinct and deserves its own logo or signature image. You can add them by clicking the Calendar tab on the left side of your station. Once there, click the +New Show button and scroll to the bottom, and you’ll find a Style Section where you can upload the logo. These images will appear alongside the show on your Radio Page.
Each song you play on your station can be visually enhanced on your Radio Page by adding its album cover art. To do this, go to the Styling section on the bottom of your Radio Page Settings and check the “Show album cover art” box. You will need to provide accurate metadata for the tracks when you upload them in order for album cover images to appear. Airtime Pro will do the rest by sourcing artwork from an online database, and placing it in the bottom left corner of your Radio Page alongside the title of the song as it is playing.
Step 4: Add Accent and Background Colours
For extra visual pizzazz, you can also change the accent colour of your Radio Page to better match your logo or background image. Choose from orange, coral, green, blue or aquamarine, and this accent colour will appear in your Navigation Bar, Schedule tab and Podcasts tab.
The Navigation Bar on the left side of your Radio Page can also be customised by selecting either Dark or Bright. If you choose Dark and have opted to keep the default logo, the letters “RADIO” will automatically adjust to white lettering. With the default Bright setting, “RADIO” appears in the standard black font colour.
Step 5: Take Full Advantage of Airtime Pro’s Functionality
On the bottom of the Radio Page tab, in the Styling section, you will find more options that will add functionality to your Radio Page.

Take Full Advantage of Airtime Pro’s Functionality
Check the “Show login button” box and a login will appear in your Radio Page Navigation Bar so that you or your DJs can quickly access your Airtime Pro instance.
Select the “Show embed button” box, and an embed link will appear in the lower right corner of your Radio Page, allowing anyone to access the code for placing your station’s player widget on their own websites.
Should you have any questions about customising your Radio Page, or about starting an internet radio station, our help section offers detailed guidance on this and many other subjects.